This feature's availability depends on your subscription plan and role.
This article is intended for Izix admins
Definition : Single sign-on (SSO) is an authentication method that enables users to securely authenticate with multiple applications and websites by using just one set of credentials.
Definition: User provisioning refers to automatically creating user identities and roles for applications. Azure AD application provisioning refers to automatically creating user identities and roles in the applications that users need access to.
This article presents the way to set up the Microsoft Azure integration within Izix and its different possibilities.
How to set up the integration with Azure directory
1. Add our non-gallery azure application (mandatory)
1.1 Integrate Izix App inside Azure
-
- Connect on Azure https://portal.azure.com/ as an admin member of your organization.
- Go to “Microsoft Entra ID” by clicking on the following icon in the action bar on top of the screen
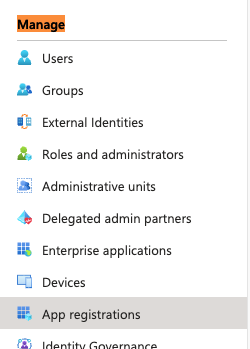
- On the left menu, in the “Manage” section, go to “App registrations”
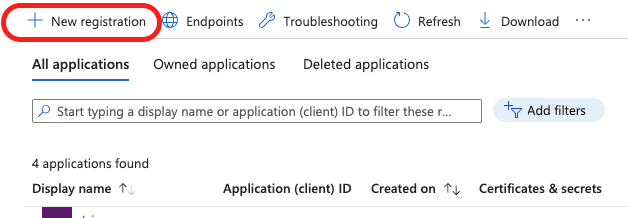
- Click on “+ New registration” in the action bar of the page
- To register a new application, enter the name and information requested in the form :

- In your list of applications, click on the newly registered app.

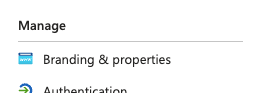
- In the left pane “Manage” menu, go to the “Branding” section (first sub-menu).
- You can upload an image to use as the icon for the Izix application on Azure (optional). Download our Izix icon by accessing the following link: https://izix.eu/img/logo_bepark/bepark-business-app-icon.png
- Set the “Home page URL” to https://app.izix.eu (required)
- Save your changes by clicking on “Save” in the action bar of the page

1.2 Configuration inside Izix
-
- Go to the panel of Azure integration inside Izix. Select “Azure AD”
- You can also reach the page from here: https://app.izix.eu/ > Settings > Integrations > SSO > Azure AD

- You can also reach the page from here: https://app.izix.eu/ > Settings > Integrations > SSO > Azure AD
- On the overview of the newly created Application inside Azure, you have the “Application (client) ID”. Copy-Paste it inside the “CLIENT ID” field in the Izix Azure configuration.


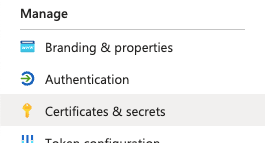
- In the left pane “Manage” menu inside Azure, go to the “Certificates & Secrets” section (3rd sub-menu).
- Click on “New client secret”, enter a description and select the period you want to Refresh the token. ( Keep in mind that you’ll have to update it in Izix when it will expire )

- Go back to Izix, copy the key displayed in the “Client secret” list in the column Value, and paste it into the “CLIENT SECRET” field in Izix

- Go to the panel of Azure integration inside Izix. Select “Azure AD”
2. Add Azure Group & Synchronize them
This section refers to the setup of the user provisioning. This section can be skipped if integration only aims to set up the SSO.
2.1 Configure your Azure Group in Izix
-
- Go to the panel of Azure integration inside Izix. Select “Azure AD” and then "Edit" on the top left.

- For each new group you want to add, click the “+” button in the bottom section. There you can select which roles you want to attribute to the users of this group and their languages.

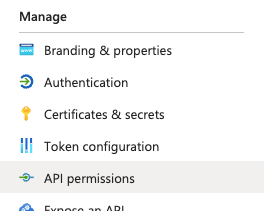
- Go back to Azure > Microsoft Entra ID > App Registrations, select the registered application, and go to “API permissions” in the left pane menu.
- The permissions required for the app is User.Read, User.ReadBasic.All and GroupMember.Read.All if you want to be able to synchronize your user in our system.
- To add permissions:
- Click on “Add a permission”
- Select “Microsoft Graph“ in the first block of options
- Select “Delegated permission”
- In the search box, search for the missing permissions
- Select the permissions to add by clicking on the tickbox
- Click on “Add permissions” at the bottom of the page
- Back on the permissions overview, click on “Grant admin consent for (...)” and answer “Yes” (see the first image of this section of the document).


- To add permissions:
- Go to “Manifest” in the left pane menu (last menu of the “Manage” section)
- Find the key “appRoles”

- Replace it with the following code :
-
 "appRoles": [
        {
            "allowedMemberTypes": [
                "User"
            ],
            "description": "Manage stuff with this role",  // Description of the role
            "displayName": "Manager Role",        // Name of the role
            "id": "148a37e2-77ed-4485-8e73-ab02dfc2d151", // Your UUID Generated, the ID of the role (https://docs.microsoft.com/en-us/azure/active-directory/develop/howto-add-app-roles-in-azure-ad-apps)
            "isEnabled": true,
            "lang": null,
            "origin": "Application",
            "value": "manager"
        }
    ],

-
-
Save your changes by clicking on “Save”
- Find the key “appRoles”
- Go to the panel of Azure integration inside Izix. Select “Azure AD” and then "Edit" on the top left.
2.2 Synchronize your user inside Izix
-
- For each group you want to synchronize with Izix:
- Enter a tag to attribute to all the users of this group in the 1.
- Copy/paste the “Object ID” of the group from the group information page on Azure (search “Groups” in the search bar, click on the group name to see the details of the group) in the 2
- Select the roles to attribute to the profiles of the group in 3 (always leave the “Not registered” and “Simple user” roles selected)
- Select the language of the Izix application for the profiles of the group in the 4

- For each group you want to synchronize with Izix:
3. Allow user to log in to Izix using Azure
3.1 Common Settings
-
- Go to Izix > Settings > Integration > SSO > Azure and copy the two callback URLs in the “URL to whitelist in your Azure application (Redirect or Reply URL)”
- Go back to Azure > Microsoft Entra ID > App Registrations, and access the overview of the registered application by clicking on the application name.
- Click on the link next to “Redirect URIs” - Depending on the user journey you followed on Azure, you might not be able to record the two callback URLs from Izix immediately. To do so, you have to add a platform by taking the following steps :
- Click on “+ Add a platform”
- Select “Web” under Web Applications
- Copy the first of the two callback URLs
- Leave the Logout URL empty
- Click “Configure” and skip step b hereafter as you already added the first of the two callback URLs in this step
- Enter the first of the two callback Url

- Get the second URL from the previous step in the field under “Redirect URIs”
- Click on “Add URI”
- Enter the second callback URL copied at the previous step in the new field
- Enter https://business.bepark.eu/logout in the field under Logout URL
- Save your changes by clicking on “Save” in the action bar of the page

-
Now you need to add another platform for mobile application authentication with Azure SSO.
-
For Android applications:
-
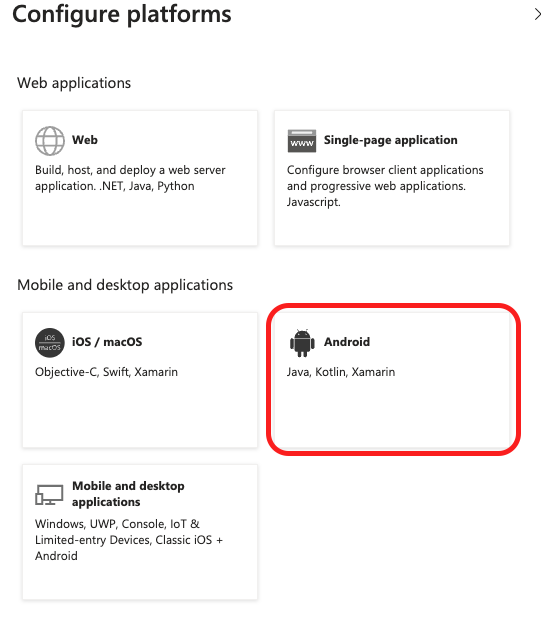
Click on “+ Add a platform” a new Time
-
Select “Android” under Desktop and mobile apps
-
Enter package name and Signature hash information
-
Package name: com.bepark.besaas
-
Hash information: VzSiQcXRmi2kyjzcA+mYLEtbGVs=
-
-
Click “Configure” and Finished
-
The redirect URL should be now:
-
msauth://com.bepark.besaas/VzSiQcXRmi2kyjzcA%2BmYLEtbGVs%3D
-
-
- For iOS (Apple) applications:
-
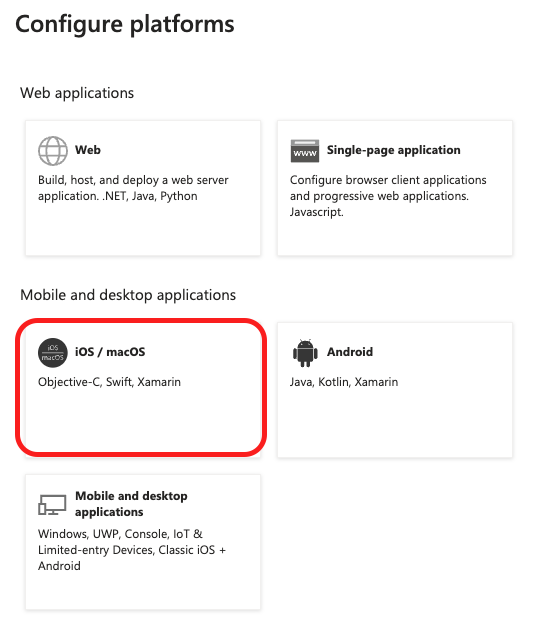
Click on “+ Add a platform” a new Time
-
Select “iOS / macOs” under Desktop and mobile apps
-
Enter Bundle ID
-
Bundle ID: com.bepark.besaas
-
-
Click “Configure” and Finished
-
The redirect URL should be now:
-
msauth.com.bepark.besaas://auth
-
-
- The result should be this ->

-
- Click on the link next to “Redirect URIs” - Depending on the user journey you followed on Azure, you might not be able to record the two callback URLs from Izix immediately. To do so, you have to add a platform by taking the following steps :
3.2 Previously imported users
- Go back to Azure > Microsoft Entra ID > Enterprise Applications in the left pane menu.
- Click on the Izix application you just registered
- Go to “Properties“ in the left pane menu and update the information with the following parameters :
- Enable for users to sign-in? Yes
- User assignment required?
- Select Yes if you want to allow only some selected users to use the integration
- Select No if you want to let any of your users use the integration.
- Save your changes by clicking on “Save”

- Go to Izix > Settings > Integrations > SSO > Azure AD
- Click on “Import” in the action bar of the screen
- Log in to Azure with your own credentials
Congratulations, your Azure Directory has now been uploaded to Izix. To make sure of that, go to Izix > Organisation > Profiles and check that the users and information you configured in Azure have been well imported.
3.3 Users created externally from Azure importation
-
- Allow Login for user created externally from azure importation

- Add authorized domains
- Allow Login for user created externally from azure importation
Add the list of domains that will be allowed to connect through your azure integration. It means that if a user with an email coming from this domain tries to connect to our system with Azure, we will check if this user is present in your organization. If yes, he will be connected to your organization.
This is mandatory to be able to use this option.
(Example : The domain is what is after the @ such as “izix.eu” - with email as john.doe@izix.eu )
